Monday, August 30, 2010

Fondant!!!

I wanted to do a blog post about fondant because it’s something I recently learned how to do, and it’s way easier than I thought it was going to be!

You see, I volunteered to make a cake for my Grandaddy’s 90th birthday! Of course I had no idea what to do for a grown up birthday cake and I wanted it to be extra special, so I went online and I found this cool family tree cake, but I knew that it would be really hard to pull off with icing. So I began searching fondant.

I asked friends who all said most of it didn’t taste very good and that just wouldn’t do. One weekend I baked a cake mix into three small cakes and topped each with a different flavor of icing. Canned vanilla, canned chocolate and homemade cream cheese frosting (I’ll never eat canned cream cheese frosting again).

I put all three into the fridge and started working on fondant. I tried one kind that claimed to taste like buttercream, but it just turned out to be a sticky mess! Then I tried marshmallow. The first batch again turned out bad, but I tried again and this time it worked!

So how did I make it? Throw some mini marshmallows in a bowl with a little water (1 tbs). Heat in thirty second intervals in the microwave stirring after each heating. Finally when it’s all melted, start adding some powdered sugar. When it starts coming together, spread some Crisco on your counter and all over your hands. It’s best to keep this in a bowl on your counter because as it works into the fondant it will start sticking to your hands and the counter and you’ll need more!

Then you just knead it, adding more and more powdered sugar until it’s all like a soft modeling clay consistency. Then slap it in a Crisco greased container and put it in the fridge. I bought a fondant mat that I could use to roll it out and it really helps to measure how big a piece of fondant you’ll need. And a fondant roller that will help roll a consistent thickness.

Carefully drape it over your cake and use a fondant smoother. There are tons of tutorials on the net so just google it and have fun! I started with these cute cakes. Just a couple of white cakes, then decided to try to tint it with gel colors and stick fondant shapes on the outside.
I decided and consulted coworkers and Jack that the cream cheese frosting had the best taste with the fondant! So I made these cute cakes for Nell’s birthday!
Red Velvet cakes with cream cheese frosting and blue fondant with white fondant stars and red trim. For Nell’s “smash” cake, I just frosted a yellow cake with vanilla frosting and decorated it with blue fondant stars and red trim.

Here it’s served with some cake balls which I’m going to share in another post! 
So now I was ready for my grandaddy’s cake! I started with a chocolate sheet cake and homemade cream cheese frosting. Then I covered it with white fondant. I had some problems with tearing this time. I think maybe I didn’t use enough powdered sugar in this batch! I then tinted two balls of different shades of brown and mixed them together to create the marbled tree trunk. I used some dark green fondant and hand cut out all those little leaves! I was so tired of leaves. Then I used some brighter green fondant and made larger leaves. I used am edible marker and wrote each child, grandchild and great-grandchild’s name on a leaf. Then used the same edible marker to “carve” my Grandaddy’s initials into the tree. It was really a hit!
Some people want to know what’s next?

Well I’ll tell you, no fondant for quite some time!

Thursday, August 26, 2010

The Hot Dog Wrap

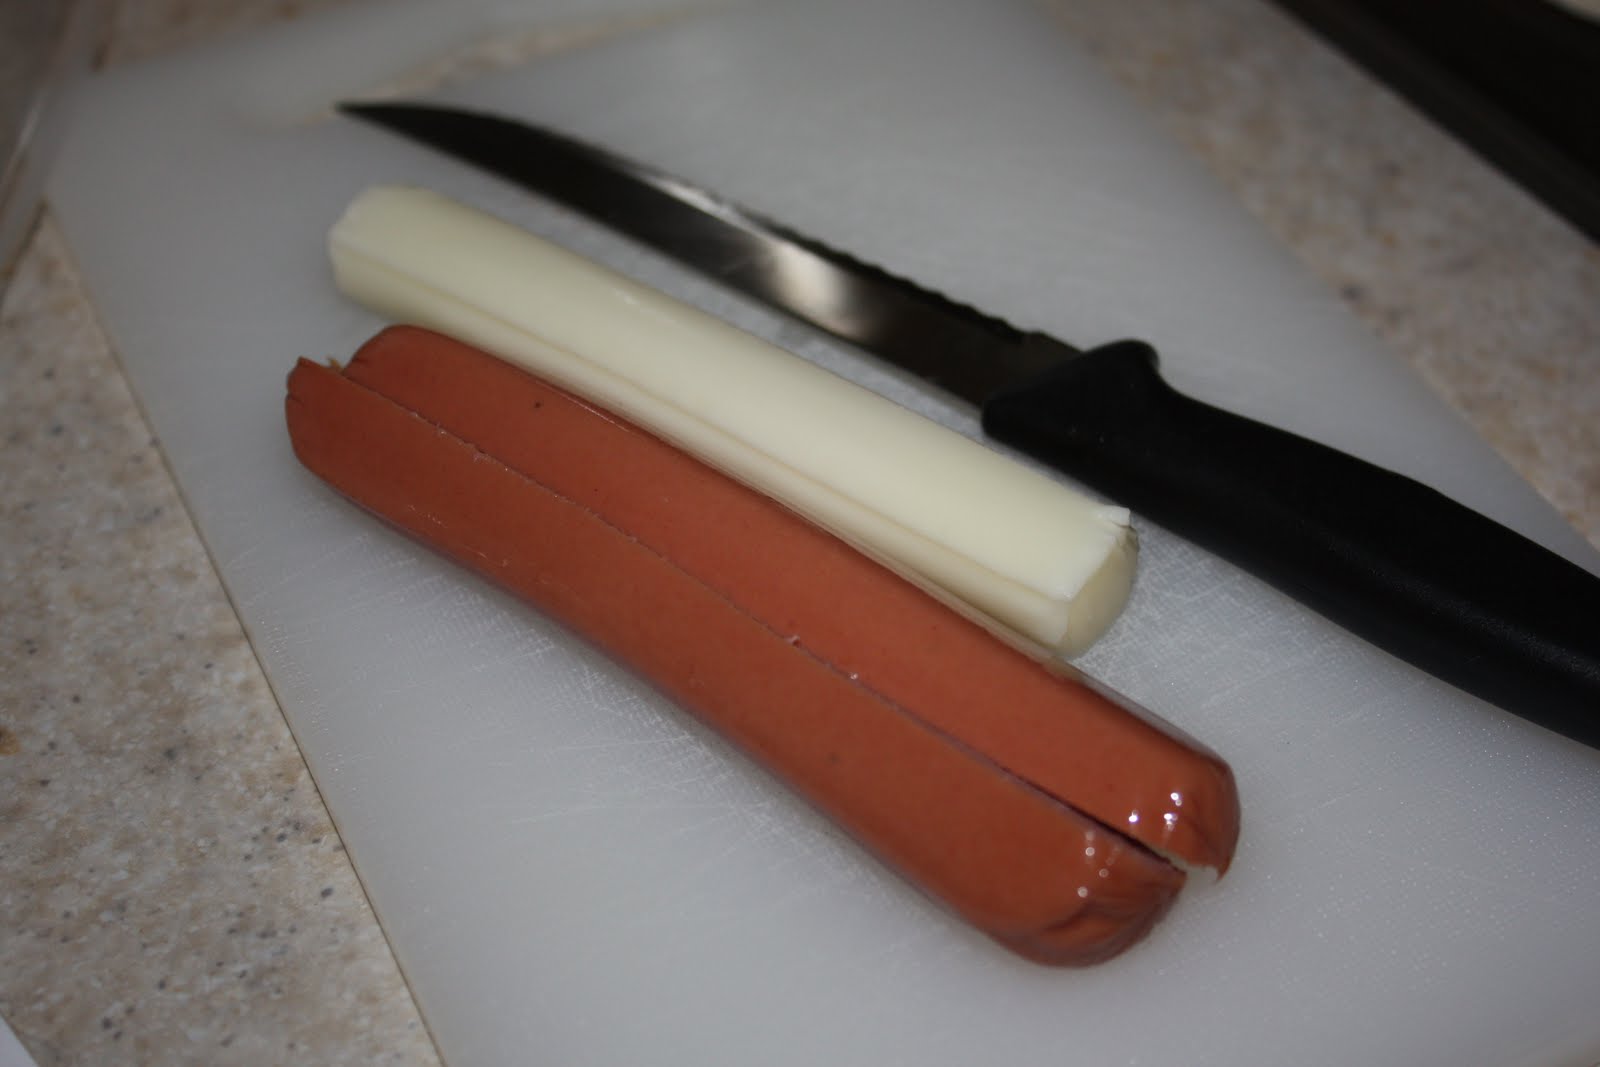
 A couple of months ago I was poking around on Facebook and saw my friend and former neighbor Rhonda posted this recipe. It looked like so much fun that I went out and bought string cheese no my way home from work and we tried it that night. You see, I have an almost four year old in my house and that child could eat hot dogs, cereal and macaroni and cheese every day! Seriously! I know some of you feel my pain, right? So I made this that night. It was so fun and easy that I'm sure it will be a staple in my house.  

Hot dog wraps. 
 

You need hot dogs, string cheese and tortillas (the small ones)
 
Cut your hot dogs lengthwise down the middle
 
Then place on your tortilla and roll it up
 
Place on baking sheet seam side down and bake at 375 for about fifteen minutes.
 
I served it with baked beans and a little ketchup and mustard! They were easy and really tasty. 

You can of course substitute any tortilla you want and light hot dogs if you want. My child doesn't know the difference!

Monday, August 23, 2010

Girls are just...different

Since I’ve been gone, this little girl turned one.She is really such a light in our house. Even her brother can’t resist her. The smile and those curls. She’s now walking all over! One thing about her that we never experienced as much with Jay is her separation anxiety. She really wants to be with me or Jack at all times. If we’re in the room, she hardly goes to anyone else. I spent her first birthday party running out of rooms so that other family members could enjoy holding her!
This child thinks about things. At this age, Jay was just banging things together. Dropping things, throwing. Nell really thinks about what she does. She puts things into things and takes things out. She looks and works at things. She most enjoys emptying her toy bin one item at a time!
She does not like the outdoors! Grass is not her friend. Notice the feet held aloft in this picture!I really thought this would make a cute picture…I was wrong.And she has attitude!!!
This little girl is growing. Last night she started crying in her sleep and I went in to comfort her. I sat on the bed and held her against me as she fell asleep and remembered all the nights that I laid in that bed with her hoping she would go to sleep. This year has gone by too fast. I want to remember each moment.

Thursday, August 19, 2010

Cake Balls!!!!

So I’ve gotten a lot of questions lately on Facebook about cake balls. These are yummy little bits of goodness dipped in chocolate and rolled in sin! I actually can’t take much of the credit here as I discovered these through Bakerella. If you haven’t seen her site before, go now, really. Things will make more sense if you do. Then come back. I’ll still be here. I love her site and everything she does. For Valentine’s I always make her red velvet sandwich cookies. Her recipes range from very technical to so so simple. And she introduced me to cake balls. These little things are so yummy, and are a hit everywhere I take them. You can do them to.
Simply bake a cake. Just a boxed mix is great for this. Follow the directions on the box. I bake mine in just a glass casserole sized pan. You're just going to crumble it up so the shape of the cake doesn't matter at all.
Next, crumble it up (I use a food processor) and mix with a tub of frosting (I like cream cheese frosting. Gives it a great taste.IMG_4936Then roll into balls. This time around I used a white cake mix and then tinted it blue and green with gel colors. Put these in the fridge for a while to firm up. It works even better if you pop them in the freezerIMG_4965Melt some candy coating, I’ve used white and milk chocolate flavor. Then dip the ball into the candy. Put on wax or parchment paper and pop back into the fridge. I usually do a few balls at a time. Put a few in the freezer, then dip a few, then into the fridge. It helps to do them in batches because once the cake balls start to thaw, they are harder to dip.IMG_4967It’s a little army of cake balls!!IMG_4973
I apologize in advance, because you will dream about these things. when they’re in the fridge they will call out to you in a tiny voice in the night to be eaten. You will eat one, then have to turn right back around and eat another one. They’re eeeevil that way.IMG_4972
But look how cute they turned out with the green innards! I’ve also made chocolate with cream cheese frosting and white candy coating. You can try all kinds of combination. I’ve actually started just keeping cake craps in the fridge (leftover cake, cake from where I’ve leveled the top of the cake) so that I’m ready to make these whenever I need them.IMG_4970  

Monday, August 16, 2010

This child is four

You know, I'm not normally one of those sappy moms, but going through these pictures from the last year make me a little teary. It's so hard to believe this boy is four! He's really growing up.

This year he made a new BFF in his little sister Nell.


We went to Alabama a couple of times.


To the beach once.
To the zoo with his girlfriends.

He learned to read music notes and say the rhythms.


He discovered the Black Eyed Peas (really, it couldn't have been something I don't mind listening to every car trip).


He learned to swim, he stayed away from his mother for five nights (harder on me than him) when he made his first solo visit to Alabama.

He climbed trees, jumped off the arms of our sofa and currently adheres to a hot dog and cereal diet.

This boy is our “miracle.” We were told we probably would never get pregnant without some type of medical intervention and we never gave up. Over two years we tried before finding out we were finally pregnant. He gave us quite a time getting here. Several times his heart rate would drop and I would got to Labor & Delivery to be told that everything was fine.

He arrived August 16, 2006

And today he turns four.

Happy Birthday sweet boy!!!!

Monday, August 9, 2010

Sisters are forever!

So here goes. Yesterday I realized that it had been almost three months since I wrote in my blog. Three months? Really? I used to post each week, then once a month, then… And it’s not like I took a class all summer. I even procrastinated on my papers for my Maymester class until a couple of weeks ago! But I have thought about updating. I’ve taken pictures for recipes and thought about things my kids did and lots of other things. So here goes. Again, no promises. I just want to try to get back on track.

IMG_4859

Laurian, Heidi, Danielle, Me

This weekend we were visited by some of my oldest friends. We were all Sigma Alpha Iota sisters in the mid 90’s at Georgia College (that’s right, we didn’t have the ampersand back then). We were silly girls together back then and we’re still silly now!

IMG_4860 Of course now we have kids!

IMG_4868 As I watched my child play with the children of some of my oldest friends it just made me smile. Who would have thought all those years ago that we would sit in my living room in Milledgeville and watch our kids rolling around on the floor together! It just filled me with happy.

IMG_4895 Y’all come back soon because I can’t bear to not have you in my life again!

IMG_4897

Friday, May 28, 2010

Quick and easy asian supper!

So I had fully intended to get this recipe out first thing Monday morning, but, well, I had other stuff going on this weekend so here it is. My easy asian dinner. Seriously, with a little pre-planning this dinner was ready in under thirty minutes. I marinated my steak the night before and the rice could have been cooked the night before or leftover from dinner or, like we did, call Jack on my way home and ask him to heat up some instant rice out of the box. I'm not afraid to admit I use instant rice, I use instant potatoes too. Wanna fight about it?

So, here's my easy asian dinner which turned out so yummy!

First I picked green onions and cilantro out of my own garden!
IMG_3881
Sliced and minced and added with the other ingredients to make my marinade.
IMG_3882
The recipe called for a flank steak, but I couldn't find one. This is Milledgeville, after all. But the butcher at Kroger talked me into this nice flat iron steak and told me that if I didn't like I' could bring it back and he'd buy it back from me. I'm really glad he did. This was a super tender cut of meat, and even after microwaving it as leftovers it was still tender which was suprprising as well. We will be getting this cut of meat again!
IMG_3884
Put some of the marinade in a bag with the steak and let it sit over night. This is also a good time to go ahead and cook your rice as well.
IMG_3886
So, to cook this meal, I threw my rice and a small can of peas and carrots into a skillet with some canola oil coating the bottom of the pan (next time I think I'll put the veggies in last as they were a little mushy).
IMG_3891
Then throw that steak on the grill (in my case I used a grill pan since it was a little wet outside and I didn't feel like warming up the grill).
IMG_3892
See?
IMG_3894
I made a little well in the center of my rice and cracked two eggs into there (next time I'll scramble them a little first, but admit it, it looks cooler this way).
IMG_3895
Just keep stirring and moving the rice around as the eggs cook.
IMG_3897
And the steak continues to cook on the grill pan. Just turn it and baste witht he rest of your marinade.
IMG_3907
Take it off of the grill and slice it up! Yum!
IMG_3911
Yeah, I know, this isn't the prettiest plate ever, but it will do in a pinch.
IMG_3913
But what's that on the rice? Oh yeah, a little "Yum-Yum" sauce. You know, the kind they serve at the Japanese restaurants that you pour over everything...My friends and I have spent much time at a local Japanese restaurant and every time we talk about how we could put this stuff on everything! And how we wish we had a recipe...here it is gals!!

melted butter
mayonnaise
rice wine vinegar
garlic powder
paprika
sugar

That's it. Simple, huh? The recipe I found didn't have any measurements so I just experimented and must say I dind't write down how much of everything I used. Next time maybe... But it was good! Took just a few minutes and I felt like I was at Kuroshima's!

My goal lately has been to fix dinners that use preplanning time to prepare so that when we get home it's super easy to throw it together at the last minute. I love my "Simple & Delicious" magazine that comes every two months. I get it and immediately sit down to read and reread and plan what I'm going to cook out of it! I have a whole stack of them the I flip through and find good recipes and lately I've started copying the recipes and putting them in a book so that i don't have to search for what issue that special recipe came out of! I recommend this magazine to all my friends and you can check out the link I provided and get your own subscription!


Here's the steak recipe...
1/4 cup thinly sliced green onions
1/4 cup unsweetened pineapple juice
1/4 cup soy sauce
1/4 cup ketchup
1/4 cup plum sauce
2 tbsp minced cilantro
3 garlic cloves minced
1 tbsp minced fresh gingerroot
1 beef flank steak/flat iron steak

In a small bowl combine the first eight ingredients. Pour 3/4 cup marinade into a large resealable plastic bag; add steak. Seal bag and turn to coat; refrigerate 4 hours or overnight. Cover and refrigerate remaining marinade.

Drain and discard marinade. Grill steak, covered, over medium heat 6-8 minutes on each side or until meat reaches desired doneness, basting occasionally with remaining marinade. To serve slice thinly against the grains.